It was obviously necessary to get a big flat screen, except for a few problems:
- Absolutely cannot deprive the chef of space for cookbooks, so we can't just put the TV immovably in front of the bookcase.
- There's a cathedral ceiling and no wall to mount from. There are open beams across the open space.
- This is the dream kitchen, so whatever happens has to meet magazine-grade aesthetic standards well enough to make Martha Stewart happy, so no bailing wire and string.
- I'm a cheapskate who isn't going to pay someone else a bunch of money to come up with a solution.
The solution came from a mod to Quake 2. Really. It was set in the Structural Mechanics Division in Vicksburg Missisipi -- an explosives testing place. David Hyde, an Army engineer, had modeled his workplace to battle the Strogg monsters. In one of the levels there is a hall with a large overhead gantry crane, being a beam on rollers that could move up and down tracks on either side of a ledge on the wall. You climb the ladder and move the crane while shooting monsters running around below. This is a common thing in industrial facilities, except for the shooting monsters part, and I spent enough time playing it that it's what popped into my mind, Mod still available here and also here with description and screenshot

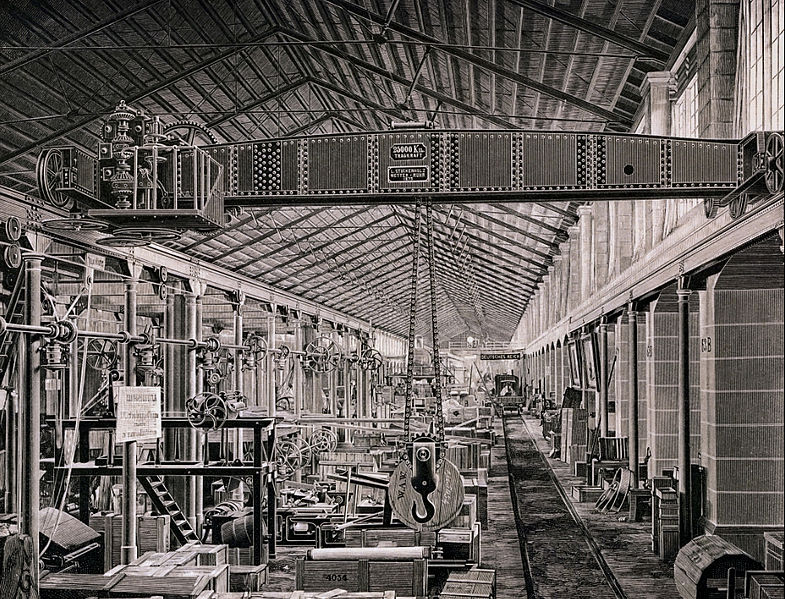
A steampunk-ish example, from Wikimedia:
Simplified drawing from here:

Not seeing it?

Span the beams with some kind of girder, from which we'll hang a pipe, and on the pipe we'll bolt on a VESA mount for the TV. On top of the beams, put some kind of track, and put rollers on the girder. This way, the TV will pull out from in front of the books, and peace will reign in the galaxy.
Stability
How do we keep the girder from tipping over, wobbling front to back? Let's look at the diagram again. The red circle shows an upside-down T that does two things. First, it gives a place to put multiple wheels to spread the load across more track. Second, it gives leverage against tipping back and forth. All the wheels are likely to stay on the track as long as the center of gravity of the load is between the front and back-most wheels.

With a TV on a pole in the original drawing, that presents something of a trick. From the side, we start with:

You'll note than unless you make the T-part long, or have a very thin TV and mount, the TV is going to be forward in relation to the cross-girder, and this can have stability problems. Guess how I found that out? You can get a straight-tube ceiling mount from Monoprice for $20, but I didn't know that at the time, and ended up not wanting that anyway.
What you see in some manufactured ceiling mounts is an offset bend in the downtube that keeps the center of gravity of the TV underneath the anchor point for the pole. For example, this $155 ($300+ list!) ProMount:

If you're willing to spend for it, you can bolt that to your moving girder and be done. Shop here, for example. But I'm a cheapskate, so I decided to make my own tube out of universal Maker Material, thinwall EMT conduit.
The right size conduit seems to be 1" which is $7.12 at Home Depot. Smaller seems too flimsy, and larger is hard to bend. Still, a bender for 1" is something I'll rarely have use for, and they are $83, which raises budget issues. Options: (a) pay it, and add to the tool collection; (b) buy it, use it, and take it back for credit. Feels funny, and costs another trip. I went with (c) pull a stick, walk down the aisle, grab a tool and bend it in the store. If I messed up, I'd buy a second one. The first one was close enough. I did practice at home with the 1/2" ($3 a stick) first.
Finishing First
Aesthetics on this were important, so before final assembly, finish the wood pieces and paint the hardware. For the pole, I used spray hammered paint, which looks right. You might have to look a little to find it, but it looks better than flat, semi-gloss or glossy for this kind of thing.
Making a girder
We're not going to be lifting engines out of cars, so we don't need a massive girder for this. The beams in the ceiling are 4x10's, and that's pretty heavy to lift up and a pricey hunk of wood. You'd still have to mount the pole to it. A hole all the way through would be awkward to drill, and I don't know if there are flanges (as used in the ProMount above) that I could make work with EMT. Instead, we'll take some 1x6 and make a mostly empty sandwich. There's 12 pieces, cut out of two 8' boards, with some scrap. Two long girders, two T-feet, nominally 3" being 1x6 ripped lengthwise, 4 end-fillers, and 4 center-section fillers and tube-clamps. These each have one edge cut at an angle, shallow enough that when around the 1" conduit, the ends can't quite meet, more 35-40 degrees than 45.

Left-right placement of the pole-holder depends on the location of the beams and where you want the TV to align. Ours ended up offset to the right so the tube would align with the center of the cabinet, which was not midway between the beams.
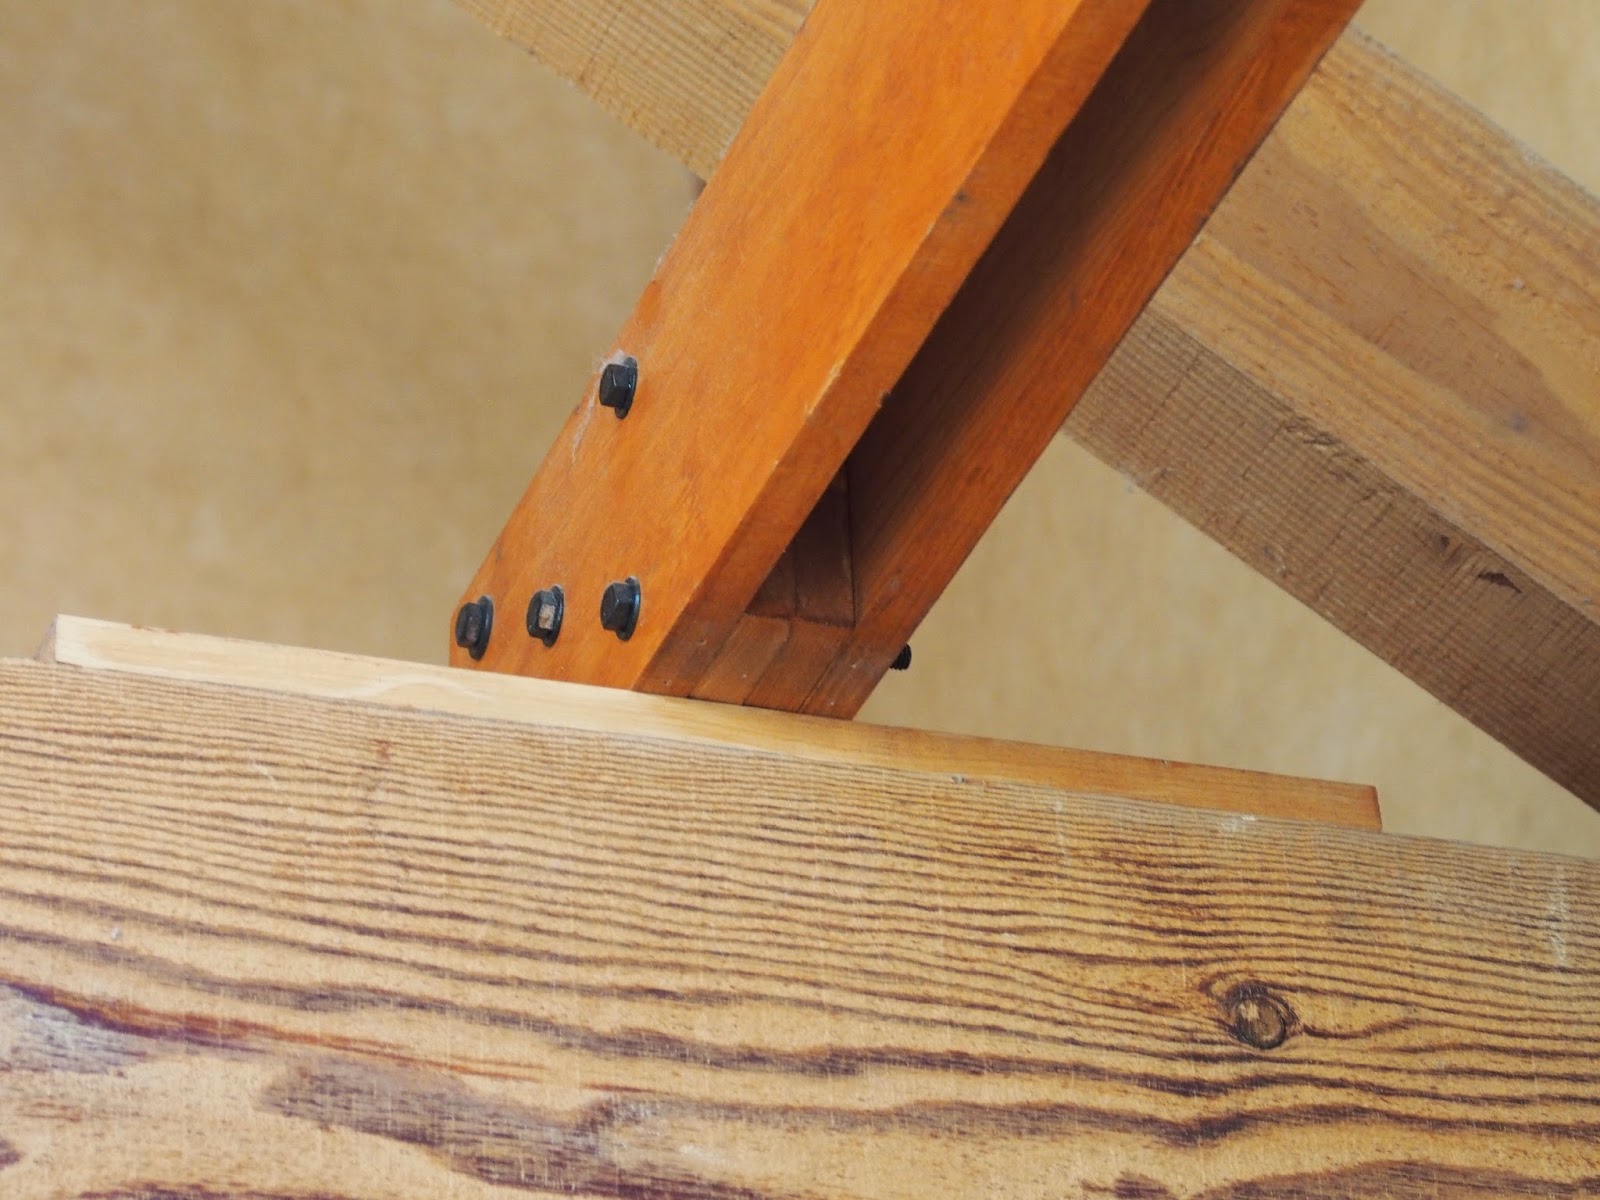
We have existing hardware in the ceiling beams to emulate:

Our sandwiches are held together with painted bolts, 5 on each side and 5 in the middle, in an X pattern. Screws would work as well, and you could use a few to go into the pole to keep it from falling out the bottom. The center bolt on mine goes right through the pole, so it isn't going anywhere.
Our sandwiches are held together with painted bolts, 5 on each side and 5 in the middle, in an X pattern. Screws would work as well, and you could use a few to go into the pole to keep it from falling out the bottom. The center bolt on mine goes right through the pole, so it isn't going anywhere.

You can use drywall screws to attach the T plate feel to the girder. Make sure they are the right distance apart and square, or the tracking will be funny.

Rails and Wheels
You can go elegant or cheap. I did cheap, and much later Kickstarted something that seemed more elegant, which I haven't used yet, described a little below. The simple solution was to use some 1/4" round steel rod, $5 each. for the track and axles, and plastic or metal screen door wheels.
To mount the axles and wheels on the T-plate feet, I routed some 3/4 x 2 channels so the wheels could recess into the wood. Cutoff a few inches of rod for axles. To keep the wheels from wandering side to side, fill space with washers. Originally I secured the axles to the foot using T25 cable stables. This wasn't strong enough, and the axles tended to knock the stables out. The final method is to make some partial channels for the axles to keep them from going front to back securing them with large topped sheet-metal screws. This isn't appearance critical, since the wheels are on the bottom, covered by the T foot and on top of the beam.
The rail rods go one on each beam. Start with one, put up the girder, then place the other to match the track width. I first stapled the ends of the rods to the beams too, and that didn't hold up either. Sheet-metal screws worked better.
The elegant alternative isn't much more expensive, and I may yet return to it for coolness at some point. You can use $5-$15 aluminum V-slot rail, $6 wheel kits and $9 wheel mounting plates. The rail is a wash on cost (except for shipping), and it is $15 a wheel rather than $3-$6 for the screen door stuff. This will also sit higher than the rod and screen door wheels.

TV Mount to Pole
Doesn't need to be fancy, the simpler the better. Can't find the one I used, but this one from Walmart looks close enough, and is $13. Two holes through the pole and a couple of bolts at the top and bottom of the back bracket and you're done.

When this backs up to the wall, the bolts sticking out the pole from here are going to hit the wall or the cabinet. I suggest using acorn or cap nuts (plastic if you can find them) to cover the sharp metal threads and keep them from gouging the points of impact.

Cables
You want to get the cables to the display neatly. I used corrugated wiring loom and zip-tied it to the pole, which isn't awful. With a larger pole, say 1-1/2, you could run cables internally, but hard to bend and you'd have to use a straight pole. At that point, you might as well use the $20 one from Monoprice. If you want bent tube and internal cables, you'll have to go commercial, I think.

To keep the bundle cable from getting all over the place when the set is extended from the cabinet, and pushed back, I used a $4 screen door spring attached to the beam and a loop in the cable for retraction. Even if you have internal routing, you'll have a slack loop from the girder to the cabinet.
To get long cables from wherever the electronics are through the loom to the TV, go no further than Monoprice. High priced cables for digital signals is a working definition for rip-off.
Results
All told, you can do this for less than $100, and your domestic relations over the TV in the kitchen will be tranquilo, especially if you get the right video to play when there's cooking to be done.


Parts list
| Part | qty | description | cost |
| 1" EMT Conduit, 10' | 1 | downtube | $7 |
| 1x6 boards, quality to taste | 2 | girders, fillers, t plates | $14 |
| 4" bolts | 15 | girder assembly | $5 |
| washers | 15 | girder assembly | $1.50 |
| lock washers | 15 | girder assembly | $1.00 |
| nuts | 15 | girder assembly | $1.50 |
| 1/4" steel rods | 2 | rails and axles | $10 |
| screen door wheels | 4 | rollers | $12 |
| washers | 24 | spacers on axles for wheels | $1.00 |
| drywall screws | some | mount t plates to girders | you have them |
| vesa TV mount | 1 | specialty part. | $13 |
| 2" bolt | 2 | vesa to pole -- check length | $1 |
| washer | 2 | vesa to pole | $1.00 |
| bolts | 2 | vesa to pole | $1.00 |
| cap nuts | 2 | vesa to pole | $1.00 |
| spray paint | 1 | pole, bolts, washers, nuts | $7.00 |
| stain | 1 | wood | $7.00 |
| cable loom | 1 | $7.00 | |
| zip ties | 5 | you have them | |
| Total | $90 or so |
Blood Cost
Fingers, metal shards from drilling the conduit. Bumps on the head from repeatedly climbing ladder and hitting the beam.
No comments:
Post a Comment